7 Strange Things You Didn’t Know You Could Do In Keynote
I use Keynote for MacOS for pretty much everything these days. I’ve even starting teaching some “Keynote Master Class” courses for teachers and coaches in my district and at other events that I’m a part of. Even in rooms with the most polished Keynote users, I always show them something they didn’t know they could do with it.
Here are a few things I bet you didn’t know you could do with Keynote:
1. Make your own icons
With the latest iOS11 update there is now a bevy of new icons available. All of these icons can be manipulated, edited, color formatted, and broken apart. However, there may be times when the icon you are looking for is not in Keynote. Did you know you could create your own?
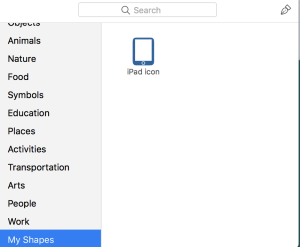
Here’s how. Let’s say you are wanting to make a cloud icon different than the one in the shapes kit. Simply make a bunch of overlapping circles, select all of them, then click on “Arrange” and “Unite” to create a solid icon that you can now change into multiple colors. This is different than “Group” as it binds all the assets together into one solid shape. You can also use tricks like “subtract” to create voids or spaces in your shapes (like when creating an iPad icon).

Once you’ve finished creating your new icon, two-finger click (right-click) on the object and choose “Save to My Shapes”. You’ll be prompted to give it a name and from now on, this icon will appear on your “My shapes” list in Keynote.
2. Create a Choose-your-own-Adventure story
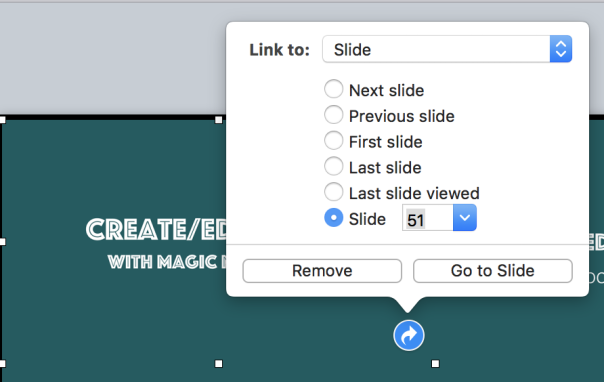
Do you remember HyperStudio stacks? How about those old Choose-Your-Own-Adventure stories? With slide hyperlinking in Keynote you can recreate this same feel by making text or images “hyper-linkable”. Two-finger click (right-click) on an object to “Add link” then select Slide as the link destination. Select the slide that you want the image to link to. The good news is, you can re-arrange slides and the links will remain intact.
3. Make powerful Infographics
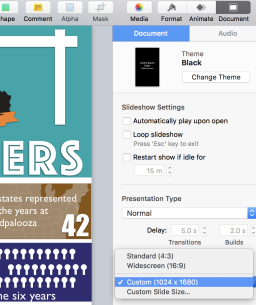
Keynote comes with multiple export options including images and PDFs. You can also change the size and shape of your keynote slide in the “Document” menu of your presentation. Besides the standard and widescreen options, you can create a “Custom slide size.” One note, do this BEFORE you create your slides or infographic as it will alter the images and text on your slide if you do it after the fact.
Tools and ideas to transform education. Sign up below.
Now that Keynote comes pre-built with icons and you can create your own (point #1), you can design, group, and arrange items on a longer slide that is visually appealing. Since Keynote has pre-built guides, it will do the spacing for you and lock them into place when they are evenly distributed.
Once you are done creating your infographic, export it as either an image or a PDF to share with others in device agnostic formats.
Side note: I also use Keynote to create custom banners for Google Forms, since you can change the slide size to something wide (Like 940 x 360) and export it as an image. (I even made the featured image for this blog post in Keynote)
4. Create a Color Pop effect with black & white images
I love seeing black & white images where a part of the color of the image stands out. In the past, if I wanted to make this “Color Pop” effect, I had to import the image into Photoshop, remove the color, create a layer, lasso the object, add back the color, etc. Now, since I can change the slides into any custom size and import as an image (see #3 above), that means I can do the same thing with an image that I alter.
Here’s what you do:
- Add the color image you want to alter to your slide.
- Customize your toolbar (go to View->Customize toolbar…) and add the “Adjust Image” tool and the “Instant Alpha” tool to your tool bar.
- Select the image. Copy/paste it on top of itself.
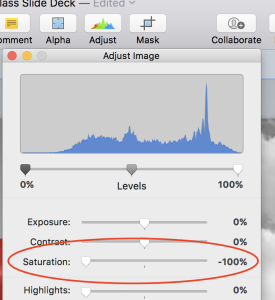
- Select the image and click on the Adjust tool.
- Turn the saturation all the way down (-100)
- Using the Alpha tool, carefully remove part of the black and white image (click and drag in small amounts) to reveal the color image behind the black and white image.
- For bonus, add a text box that matches the color with a quote or saying (use the eye drop tool on the color palette to match colors)
- File -> Export to…Images
Here’s a finished example:

5. Design art for a Children’s book
Every year I try and predict certain educational or technology innovations. I also use this post to “blackmail” myself into trying something different and expanding my skill set. This year, I said I would create a children’s book and after months of struggle, I found inspiration in a strange place….Keynote. Since you can create and edit your own icons (#1 on this list), and Keynote comes with a freehand drawing tool, I can now create icons and characters for the book and design all the art on custom-sized Keynote slides (#3 on this list).
I don’t want to give away the final design as it’s still in draft mode, but because I’m creating this entire book in Keynote, that means I can also “read” it to kids in full-screen mode (via Keynote) once it’s published. I’ll even add animations to it…
6. Create a GameShow Spinner (as seen on Jimmy Fallon)
I absolutely LOVE the random celebrity generator that Jimmy Fallon uses on his show to get celebrities to do impersonations of others or singing random songs. (Here’s a good example of Ariana Grande remixing songs with other artist’s voices.) As I watched this bit, I wondered…could I recreate that random wheel spinner in Keynote?
It turns out the answer is yes. It takes a lot of steps so rather than list it out, I created a little video of how I did it:
7. Recreate the Stranger Things opening title animation
This was admittedly just for fun until my friend from down under (Jonathan Nalder @jnxyz) approached me to create a workshop on thinking creatively or “Stranger Thinking”. I decided to see if I could use Keynote to re-create the iconic opening credits from the hit Netflix show Stranger Things.
Using the Magic Move transition and the soundtrack to the show, I was able to recreate my own version of the opening sequence. Here’s how:
- First I created the “ending” slide, or where I wanted the words to end up when they finished moving. For this particular animation, I broke apart the words into different parts and changed the shadow to red with some blur to give it a semi-neon effect.
- I found a found that matched the show opening (Benguit font) to create my word and made some transparent rectangles with red borders to create the moving shapes coming into focus.
- After I finished the ending slide, I duplicated it. On the first slide, I moved all the objects off the slide canvas into various areas in the grey area around the slide so it starts out blank.
- I then added the Magic Move transition and set the duration to 10 seconds.
- I added the Stranger Things audio file to the slide deck soundtrack. (choosing Document->Audio)
- I recorded the slideshow (Play-> Record Slideshow)
- I exported the file as a Quicktime movie.
Here’s the final result:
Now that I’ve started unlocking the potential of Keynote, I know I’m going to find more uses for it in the future. I also am working on making the above instructions into instructional videos on my YouTube channel for HookerTechTV. One person to follow that has really expanding the uses of Keynote is Katie Morrow (@KatieMorrow). She recently released a “Coding in Keynote” project and has even used Keynote to create 3D Hologram images.
cross posted at http://hookedoninnovation.com
Carl Hooker has been a part of a strong educational shift with technology integration since becoming an educator. As Director of Innovation & Digital Learning at Eanes ISD, he has helped spearhead the LEAP program, which put one-to-one iPads in the hands of all K-12 students in his 8000-student district. He is also the founder of “iPadpalooza”- a three-day “learning festival” held in Austin annually. He's also the author of the six-book series titled Mobile Learning Mindset, a guide for teachers, administrators, parents and others to support and embrace mobile learning in our schools. Read more at Hooked on Innovation.
Carl Hooker has spent the past 20+ years in education as a teacher and administrator focused on the thoughtful integration of technology and innovation. He consults for multiple districts across the country and is a frequent speaker at state and national events. In his free time he's an author, DJ, podcast host, Poetry Slammer, and Trivia Night MC. He's the co-founder of the social platform K12Leaders.com. Check out his latest book Ready Set FAIL! Now available for order here: https://mrhook.it/fail Read more of his blogs at Hooked on Innovation.
